Tuesday, 10 January 2017

Rainbow Baby Blanket

This one has been a long time coming. I've started the blanket in July, hoping to have it ready during the summer. After all, the whole idea was to make something light and airy so it could be used for the warm days. 

I finished it in December...oh, well...At least we could use it during our Christmas holidays on Gran Canaria. And it is big enough to serve our son during spring and summer 2017, so the work was not in vain. 

I am pretty happy with the end result, although I wouldn't mind switching the colors around a little bit. It is easier to see how the play together, now that I used them. 

The yarn I used was Sandnes Garn Madarin Petit in 15 colors, plus the grey border.


I very much like the simple pattern. It relatively simple and quick to make and it results in an airy fabric which was what I wanted for a summer blanket. I am also happy about the little "bubbles" which my baby likes to explore.

The yellow stitch is the "bubble" it is made by stitching 3 double crochets leaving the last 2 loops of the last one on the hook. Then you pick up yarn again and loop over all the double crochets 3 times. Finally pull yarn through all the loops you have on the hook. You can probably also try a raspberry or bobble crochet stitch instead.


Et billede slået op af Maria Lind (@mariafurya) den

Thursday, 30 June 2016

Crochet Badass Baby Vest

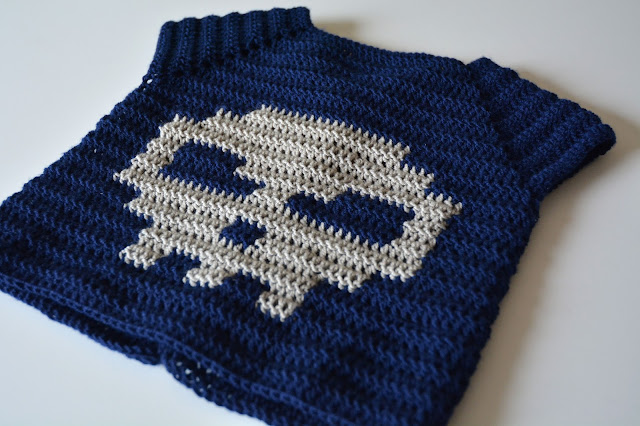
The badass baby vest is my newest crochet project. The pattern comes from Garnituren and I am completely in love with it. The pattern is easy to follow and well written (though in Danish) and the finished item is simply so cute.

One of the best things about the vest is that, even with a 3 month old at home, it only took me about a week to make. 

A photo posted by Maria Lind (@mariafurya) on

This is the basic version of the vest. I followed the pattern and did not add any emballishments. However, following Garnituren's suggestions it is very easy to add a pocket, trimmings or buttons.

Also changing the pattern in the back shouldn't be difficult. I was tempted to make an anchor, fitting the color scheme, but it will have to wait till next time.

Badass Baby Vest

The website says that this is a size for a 9 months old but my 3 month old son fits pretty well into it. It is maybe a little loose and will serve him for a while but it is not too big to use.

I used Sandnes Garn - Tynn Merinoull yarn which has the prescribed weight (50g = 175m) and I am very happy with it. Sandnes makes great quality yarn.

Thursday, 23 June 2016

Octopuses for Preemies

Octopuses for Preemies is a project by many different groups and individuals (Denmark - Spruttegruppen, Poland - Ośmiorniczki dla Wcześniaków, Finland) to crochet and knit yarn octopuses and send them to neonatal wards. The trend started in Denmark and the doctors here argue that the little toys help stabilize the prematurely born babies while keeping them company in the incubators.

I first heard about this fantastic idea from Gosia at mynomadhome while I was still pregnant. I couldn't crochet than due to swollen, gigantic, clown hands but the plan was always to make a couple and send them to the nearby hospital.

As it turned out, when Maks was born he was admitted to the stabilizing unit and got an octopus himself. Even though it didn't change how scared we were for his well-being and safety, it still felt nice that he had this little friend to hug and maybe feel a little better thanks to it.

Et billede slået op af Maria Lind (@mariafurya) den


So once things here at home calmed down and I found my "sea-legs" as a new mother, I made these two fellows that are now on their way to become someone's little buddies and hold their hands in tough times.

Et billede slået op af Maria Lind (@mariafurya) den

I used the pattern available at Spruttegruppen's website and if you need an English version, have a look at Gosia's blog.

I encourage all of you to grab your needles and hooks and get to work for the littlest ones. And if you need any help with the patterns or any questions let me know.

Saturday, 30 April 2016

Quick snacks that saved my sanity in the first weeks with a newborn

Our son, Maks, is 5 weeks old tomorrow and I couldn't be happier for my little bundle of joy. But being a new parent is not a piece of cake. 

And speaking of cake, here is a challenge I have not foreseen when preparing for my maternity leave: eating regular and healthy meals! 


I mean sure, I had prepared frozen dinners. And they are great for the evenings when your partner is home and can help.


But during the day, when you are all alone with your newborn who demands ALL of your attention and hands, making and eating a full meal (and by that I mean something as advanced as a sandwich) is a real challenge. 


So when you don't sleep enough and start your day at 5 or 6 am, use a lot of your body resources on breastfeeding and caring for your baby but your breakfast doesn't start til 10 and doesn't end til 12, having a quick snack solution is a life saver. 


Here are a couple of the recipes/ideas that really came in handy in the past few weeks:


Oatmeal cookies - recipe from my awesome Sister.

These cookies take 5 minutes to mix and 15 minutes to bake. They are packed with healthy calories to keep you going for a while. And you can easily control how sweet they are and "spice" them to your liking. They will also keep 4-5 days before starting to get a bit dry.

Ingredients (makes 12-15 cookies):
  1. 2 bananas - mashed
  2. About 12 spoons of oatmeal
  3. A table spoon of flour
  4. A teaspoon of honey (if the bananas are ripe and sweet, you can skip that)
  5. 1 egg
  6. A pinch of baking powder

Mix this basic ingredients in a bowl and then add anything you might like: dried or fresh fruits, nuts, chocolate chips, coconut, peanut butter, cinnamon etc. My personal favorite is fresh blueberries (although frozen would probably be as good), dried cranberries and a bit of dark chocolate chips.

Bake cookies for about 15 minutes in 200C hot air. And enjoy!


Pre-cut fruits and veggies

When you have time during an evening or weekend, peel and cut fruits and vegetables so you can easily grab a healthy snack when you are passing by the fridge.

Peeled carrots hold well in a cup filled with water. Bell peppers, watermelon, apples, radishes...cleaned and cut in small pieces are fantastic. If they are as easy to eat as a piece of chocolate, you are more likely to make the right choice.

I also like to pre-make a salad so I can eat it during the week for lunches. If you don't add any dressing, it will keep in the fridge for a couple of days without going bad.


Fried chicken and fish

Slice chicken or fish filet and fry it on the pan or bake in the oven, the way you like it (in breading, herbs or without anything). Keep it in the fridge and add to your salad or just eat as a quick snack during the week.


Don't forget the water!

It is easy to dehydrate and water is soooo important. The best way for me to remember about water is to have a couple of flasks standing around the house. This way, wherever I am, I can always quickly grab a couple of swallows - and the bottles remind me to do it.

Tuesday, 22 March 2016

Handmade Easter Eggs

Easter is approaching rapidly and due to awaiting our first baby, I got a bit blindsided by it. Most years, I visit my family during this holiday (yummy-est food ever!) so I don't have any decorations stored in the basement.

My mom decorates these beautiful eggs but I am not really that good with a paintbrush so my decorations are much more minimalist.

Here is a quick and simple idea you can make within one afternoon - pompom eggs.

Et billede slået op af Maria Lind (@mariafurya) den

Make pompoms as shown in this tutorial but instead of shaping them into balls, shear one end much more than the other, to make an egg shape.

And if you are feeling in the mood, make a couple yellow balls and attach beaks to make chickens.

And as I was in a pom pom making mood, I made this baby mobil for the little one.

Friday, 18 March 2016

Sewing for a newborn


I am in week 40+5...that's right, that is 5 days past due date. I guess the first lesson of parenting is here to hammer its point: it's no longer about you. The only thing you can do now is wait.

So I breath in, breath out, eat a cookie and try to arm myself in zen-level patience.

Meanwhile, here are my sewing projects made in the last couple of months.


Baby nest

Baby nest is a baby mattress that can be made into a little crib. It's a portable bed to use in an actual baby bed, crib or on a couch. I cannot say if it's practical or not just yet but it looks very cozy and is really easy to make.

I made mine with a thick furniture fabric on the bottom to make sure it will last long without fraying and a cotton fabric on top to make it nice and soft. The one thing I learned is that you shouldn't over-stuff the sides because they will be impossible to "close-up" if they are too hard.

There are many tutorials online but the one that I used was this one: http://www.jaggedrose.se/blog/2014/11/scandi-baby-nest-tutorialsew-along-fabrics-supplies/


Harem pants

The second project, I've been busy with is sawing harem pants for the little guy.

I should start by saying that I am not a fan of color-coding your child or worse, dressing your baby as if it was an adult.
There is absolutely no reason on this Earth to dress your boy exclusively in blue and your girl exclusively in pink. And dressing a baby in minimized teenager outfit is creepy.

Children should be surrounded by vivid colors and whimsical characters but in Denmark buying clothes for children is really hard. Everything is in washed off pastel colors, color-coded or way too adult for a baby or toddler. I mean in what universe is this fine for a 2 year old? A halterneck top in size 92!?

Obviously, I am exeagerating a bit and if you look around you can find better choices. Especially for boys. But the problem is that you actually have to work for it, to dress your child like a child!

This is why I am really excited to pick out my own fabrics and sew for my little one. Obviously, I won't be able to make all of his outfits. Both the time required and the costs would be astronomical. But at least I can add a couple of very happy items to his collection.

The harem pants are quick and easy to make (can you spot the theme here - remember, I am still a beginner) and they look adorable. I used this tutorial and the only detail I changed was the width of the stretch fabric. You can figure out yourself, what works best for you. I am planning to make a couple more pants when the baby arrives and I know the exact size, I should go for.

harem pants


Saturday, 5 December 2015

Sew Simple Christmas Wrapping


This year, my Christmas crafts are pretty limitted. It is mostly because we're visiting my family and so there is no Christmas tree and much Christmas decorations this year. But also, I am going a little bit crazy with sewing and knitting project for our bundle of joy coming in March. There will be a whole other post about sewing for our future baby but for now, you can have a quick look over here.

There is however one Christmas project that I jumped into and that is reusable wrapping for the gifts.

I am not the most environment-conscious person ever but there are many small things I like to do in my life to make our everyday life a bit more ecological and a bit less wastefull. My husband is vegetarian and I eat little meat, we compost our organic waste and try to plan our dinners and freeze leftovers so that we don't throw away food.

So this little project just felt like a great idea. Fabric wrapping is super easy so it's a great beginner's project. It looks lovely and gives your Christmas gifts that extra personal touch. And of course, the wrapping can be reused and so it keeps your holidays a bit more environment-friendly.

Instructions

So here is what you do:
  • Measure the height and width of your gift. Remember to add the depth of the gift to both height and width if it is of any significance.
  • Add 5 cm to the height and 2 cm to the width of the gift to figure out the measuremants of the frabric piece, you're going to need. Remember that you will have to cut double the height. The extra 5 cm are used making tube for the ribbon and leaving space for gathering the sack. The extra 2 cm are for seam allowance (see the pattern below).  

Et billede slået op af Maria Lind (@mariafurya) den
  • Cut the piece of fabric, fold it evenly, right side in and sew them together along the long edges, on the 1cm seam allowence mark.
  • Cut about 4 cm of the fabric on the outside of the seam from the top of the wrapping. This will allow you to wrap the top of the fabric to the outside, producing the ribbon tube. You can decide yourself, how broad the tube needs to be. It will depend on the size of the ribbon you want to use. I am folding about 3 cm and sewing 1 cm from the edge to leave 2 cm tube.
  • Sew a seam all around the tube, fastening it's outer edge to the fabric.
  • Turn the sack right side out and cut the tube in the middle of one side making and opening for the ribbon. Make sure you don't cut the bottom seam though!
  • Use a safety pin to pull the ribbon through the tube.
  • Et voila! The wrapping is ready.
This is the simplest possible wrapping type, the sack. If you are feeling brave you can look for other types like this lovely bottle package.

Enjoy your crafting and have yourself a Merry Christmas!

Et billede slået op af Maria Lind (@mariafurya) den