Showing posts with label project. Show all posts

Tuesday, 10 January 2017

Rainbow Baby Blanket

This one has been a long time coming. I've started the blanket in July, hoping to have it ready during the summer. After all, the whole idea was to make something light and airy so it could be used for the warm days. 

I finished it in December...oh, well...At least we could use it during our Christmas holidays on Gran Canaria. And it is big enough to serve our son during spring and summer 2017, so the work was not in vain. 

I am pretty happy with the end result, although I wouldn't mind switching the colors around a little bit. It is easier to see how the play together, now that I used them. 

The yarn I used was Sandnes Garn Madarin Petit in 15 colors, plus the grey border.


I very much like the simple pattern. It relatively simple and quick to make and it results in an airy fabric which was what I wanted for a summer blanket. I am also happy about the little "bubbles" which my baby likes to explore.

The yellow stitch is the "bubble" it is made by stitching 3 double crochets leaving the last 2 loops of the last one on the hook. Then you pick up yarn again and loop over all the double crochets 3 times. Finally pull yarn through all the loops you have on the hook. You can probably also try a raspberry or bobble crochet stitch instead.

Et billede slået op af Maria Lind (@mariafurya) den

Thursday, 30 June 2016

Crochet Badass Baby Vest

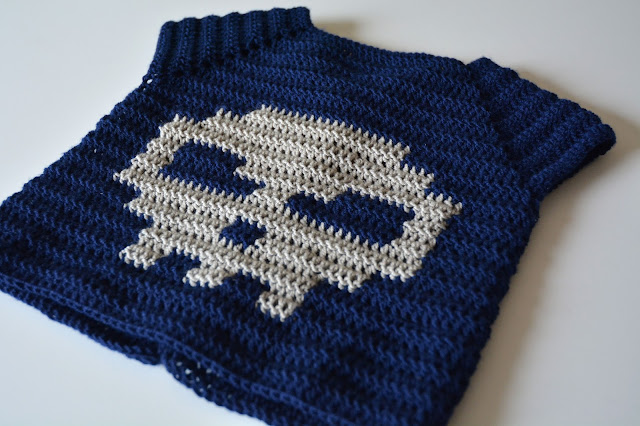
The badass baby vest is my newest crochet project. The pattern comes from Garnituren and I am completely in love with it. The pattern is easy to follow and well written (though in Danish) and the finished item is simply so cute.

One of the best things about the vest is that, even with a 3 month old at home, it only took me about a week to make. 

A photo posted by Maria Lind (@mariafurya) on

This is the basic version of the vest. I followed the pattern and did not add any emballishments. However, following Garnituren's suggestions it is very easy to add a pocket, trimmings or buttons.

Also changing the pattern in the back shouldn't be difficult. I was tempted to make an anchor, fitting the color scheme, but it will have to wait till next time.

Badass Baby Vest

The website says that this is a size for a 9 months old but my 3 month old son fits pretty well into it. It is maybe a little loose and will serve him for a while but it is not too big to use.

I used Sandnes Garn - Tynn Merinoull yarn which has the prescribed weight (50g = 175m) and I am very happy with it. Sandnes makes great quality yarn.

Thursday, 23 June 2016

Octopuses for Preemies

Octopuses for Preemies is a project by many different groups and individuals (Denmark - Spruttegruppen, Poland - Ośmiorniczki dla Wcześniaków, Finland) to crochet and knit yarn octopuses and send them to neonatal wards. The trend started in Denmark and the doctors here argue that the little toys help stabilize the prematurely born babies while keeping them company in the incubators.

I first heard about this fantastic idea from Gosia at mynomadhome while I was still pregnant. I couldn't crochet than due to swollen, gigantic, clown hands but the plan was always to make a couple and send them to the nearby hospital.

As it turned out, when Maks was born he was admitted to the stabilizing unit and got an octopus himself. Even though it didn't change how scared we were for his well-being and safety, it still felt nice that he had this little friend to hug and maybe feel a little better thanks to it.

Et billede slået op af Maria Lind (@mariafurya) den


So once things here at home calmed down and I found my "sea-legs" as a new mother, I made these two fellows that are now on their way to become someone's little buddies and hold their hands in tough times.

Et billede slået op af Maria Lind (@mariafurya) den

I used the pattern available at Spruttegruppen's website and if you need an English version, have a look at Gosia's blog.

I encourage all of you to grab your needles and hooks and get to work for the littlest ones. And if you need any help with the patterns or any questions let me know.

Sunday, 4 October 2015

Operation Code Name: Peanut

A little time ago we found out that our family will become a bit bigger in March 2016. The working title is operation code name Peanut. Or, if I don't feel so well, code name Monster. We are, of course, exceptionally happy and excited about it. Part of my excitement shows, as it is easy to predict, in preparations.

I have already knitted a trial-hat and today I finished a play mat. It was intended as a cover, but it's knitted out of chunky wool/acrylic blend with cotton fabric sewed on so it is to heavy for a newborn.

It is my own design so I am very proud of it but there are a number of technical errors. The seams are not straight and the problem with acrylic and wool blend is that you can't entirely block it, so the knitted part stretches and contracts making the fabric bulge and fold at times.

But all in all it is a very decent first effort at this kind of project. I like that it is mixed media and mixed techniques. I will hopefully, if time allows it, play more with that and post the results here.

First came the knitted blanket itself. It was quick to make, thanks to how chunky the yarn was.


Then I washed, ironed and hemmed the fabric. That was probably the most bothersome part of the project. Straight lines and details are just not my strong suit. 


Once the fabric was ready, I packed the knitted blanket inside, fastened it with pins, making sure that the sides have a bit of a thicker border (think cheese crust in pizzas :)) and sewed it all together. 

I could have of course leave the blanket as it was but I used the fabric for two reasons. First of all, it makes sure that if the wool turns out to be to scratchy for baby's skin, I can use the fabric side instead. But even more so, the cotton with cute panda print makes the otherwise grey blanket much more child-friendly and joyful. 

The added benefit is of course that all the yarn tails and knots are just hidden between it and the fabric so I didn't have to sped time working them into the weave (you remember my dislike of details, right? :)).  

And here is the finished product. The light makes the fabric look grayish, but in fact it has a very pretty green/teal color.


I am a little nervous about how the blanket will behave in washing. Both elements were washed separately before combining but I am not sure if they won't continue to shrink and stretch independently of each other. And this could really mess up the shape of the finished project. 


Sunday, 26 January 2014

Cafe Latte Baby Blanket

No matter how many times I've started on knitted projects (and how many of them I actually finished - a few), crocheting will always my go-to method of working with yarn. 

The project I am working on now is a baby blanket with a thick, dense weave. Because it is so dense, it takes long to complete the project, but I like the texture so much, I am planning more projects with it. It will certainly serve as a sweet, warm cover for some baby. Yeah, I don't actually have a recipient of this blanky in mind, so friends and relatives, get on the topic of babies, will you? I would actually make a big blanket for myself (it really is so cozy) but I don't have enough yarn for that.


I am using light cotton-acrylic yarn that is has a soft feel to it while still being very warm. The color is cream, like a very milky cafe latte. I like it for a baby blanket, even if it's probably not very practical. 


And working on this project taught me a lesson: "never put away a project for 2 years and pick it up as if nothing happened". I wasn't sure if I remembered how to make round ends, but I made two rounds anyway. I realized I made a mistake on the round ending, I ripped two rounds...and then I realized I probably hadn't made a mistake and all the ripping was for nothing.

Anyway, I'll show you the finished piece, when I am done.

Monday, 17 May 2010

Polymer Clay: Working the Cane

My experience with polymer clay is advancing. I have to say I enjoy very much working with this medium. It is flexible, colorful and the effect of your work is almost immediate.
But it can also be a bit frustrating. When you look at clay items on the Internet and read the descriptions it all sounds so simple. But once you start working on it yourself it turns out that, even though the method is simple, you need a skill to perform it. Well, whatdayaknow...

Anyway, I struggle especially with cane making. It is one of the basic techniques of polymer clay. The simple idea is that you wrap layers of polymer clay sheets. Reduce the cane by pressing it from the middle out and than cut thin slices to use in your work. Again sounds simpler than it really is. The reduction can distort the image and the cutting can easily change the shape of the slice. But practice makes master and I shell not give up! Here comes a few points about what I learned so far:

1. To cut thin and well shaped slices you need a really good blade. A modeling knife is too thick and other thinner pieces of metal will not be sharp enough. Have a look at ebay and get yourself a proper polymer clay blade (cost: around 5 pounds/$7.20/6 euros)

2. Make sure that each layer of clay is thick before reduction. Otherwise it will become so thin, once you reduce the cane, that it will blend in with the others.

3. It is easier to reduce the cane when clay is still warm. But it is easier to cut thin slices one the cane cools down (an idea: put the cane to the fridge to cool it down quickly).

4. Black looks good as a divider between colors in the cane. However black Fimo Soft smudges a lot when cut. Very annoying.

Below is one of my first cane projects:

Saturday, 1 May 2010

Polymer Clay: Second Date

It's been quiet here for a moment. But I have an explanation, really. I spent the last week honing my polymer clay skills but couldn't show you anything because the weather was really gray here and photos wouldn't be any good. I still don't have really good equipment for product photo taking (donations anyone?). Anyway, today the sun came out for a few moments so here it comes.


So, what do you think? Have you tried polymer clay? How did it go for you?

Saturday, 24 April 2010

Polymer Clay: First Steps

Just two polymer clay pendants I made today. They are far from perfect but it was my first time, so please be gentle in your comments. Also, I really liked making them so there will be many more in the future. After all, practice makes the master.

Monday, 19 April 2010

Doilies Galore

I love making doilies. The repetitive work that leads to development of regular pattern, visible only at the end of work, has something zen-like to it. I always think about them as mandalas of crochet art. Unfortunately they don't fit my house decor so I lack reasons to make them. And that is why I was so happy recently when I got an order for a few doilies.

So let me brag about a few finished and unfinished projects:


Wednesday, 24 March 2010

Warm Coffee and Croissants

Doesn't it look scrumptious? The green cozy is my first really finished knitted project. I am so proud of it and I think it looks fantastic. I know there are several design flaws but I ignore them and stare at my coffee pot instead of drinking it.

And by the way, I am sure you all know it's Etsy Euroweek and I've been featured in this lovely European-themed treasury!

Saturday, 20 March 2010

Spring Paper Project

Spring has been shy so far in this parts. Despite a few really sunny days at the beginning of the month and the temperature steadily rising it is still very grey outside. So, one of the evening me and Mr. P had a nice, crafting session and came up with this lovely origami cranes to put in the windows.


Now we have a nice flock of blue, green and yellow birdies, flying together around the apartment. The day feels brighter right away.


Most of the cranes are hanging in the window. But I am also thinking about bringing some young willow branches from the nearby forest and making more colorful origami decorations to hung on them.

What do you think about it? Do you like to decorate your house? Is origami your thing?

Wednesday, 10 March 2010

Putting the Price


It's been quiet around here the past couple of days. Partly because I've been working on a long term crochet project. To be perfectly honest, I am not a biggest fan of large projects. I'm the immediate gratification kinda girl. If it takes too long I get frustrated and toy with dropping the project all together.

But of course, large pieces are so much more impressive in the end. So, I pulled myself together and the past 2 weeks I spent working on this scarf. Now I already have all the 40 squares and it's only a question of connecting them into two lines. I promise that as soon as it's done, I will let you know.

The biggest problem I have with this kind of projects however, is setting a price. Making one square takes around 30 min. 30 min times 40 squares = 20h. Plus minimum 2h for connecting the squares into a scarf. Minimum hourly rate in Denmark is around 100kr per hour so I should get 2200kr for this piece. This amounts to around $400. Do I think this scarf is worth that much? Absolutely! I put my skill and effort into this piece and it is one of a kind. But would you pay that much? Probably not. After all, to you it is "just a scarf".

How do you deal with this kind of problems? How do you choose prices for your items?

Monday, 1 February 2010

BeWelcome and Busy Me

I hope you all had a wonderful weekend. Mine was pretty good, but also really busy. It all started on Friday with special orders for my earrings from the new collection. Now, you will hear no complaint from me there! Nevertheless arranging the orders, packing and sending them out took some time.

Then, exactly as I suspected, I got impatient and posted the new collection into my etsy shop instead of waiting until the end of February! It's very exciting to see it finally out and about. The earrings are the first on the line and necklaces will follow soon so keep checking in.

I also worked on a new design for candle shades. And I am really happy with the outcome. The shades make beautiful light patterns and create something special out of the simple tea lights. The first pair is already for sale in the shop and they look like a great gift for St. Valentines day. I will continue with this project and I'm planning to write up tutorials for this design.

And also, all through the weekend, next to my craft projects I've been working for BeWelcome.org. Those of you who follow me on Twitter could have noticed some tweets about this great community. The basic idea of the organization is to provide a completly democratic, free and volunteer driven platform for travellers. Members can exchange ideas, tips and helpfull materials but the best part is that they also open their homes to others and meet in real life. You can read more about the project here.
As you can already see I'm completely in love with the idea and so I spent a lot of the weekend with other enthusiasts from around the world writing up and translating the community newsletter. I just love working with passionate people. Check out the website and join in the network of open doors around the globe - it only takes few minutes to fill in the form. And once you are a member, don't forget to give me a shout. You can find me under the username: demorganna.

Thursday, 3 December 2009

Paper Craft: Christmas Decorations

Now, ordinarily I am not the biggest fan of paper crafts. They just seem...temporary...to me. But, when you think about this, what better time to create temporary pieces of arts, than Christmas.

There is a long tradition in Poland of cutting shapes out of paper (see: here and here) and so every kid at school gets to do at least a couple around various holidays. So I sat down yesterday and, willing my brains to remember the school times, I made these snowflakes:

They look lovely in the window, unfortunately the weather outside is not very Christmas-y (grey skies and rain) and so the picture is nowhere near pretty enough.

I thought I will also take the time and show you how I made it (especially since it is not very difficult).

1. Take a piece of paper and fold one corner to the side.


2. Cut off the outstanding piece of paper so that you are left with a square.


3. Fold square along the diagonal line (now you have a triangle).


4. Fold it 2 more times, every time joining the 2 furthest corners.


5. Now you can start cutting. Many minute cuts make for the most intricate shapes.


6. Unfold and voila!
7. To straighten the folds, you can iron your snowflakes or keep them overnight in a thick book.
8. Connect snowflakes with white thread. You can hang them on the window frame or use as garlands.

Note: You can fold the triangles more times, it's all up to you. You can also use any symmetrical shapes (circles, hexagon etc.)

Tuesday, 1 December 2009

Christmas sneak a peak


Ok, so it is finally December and so it's time for my first truly Christmas post. The only problem is that for that I cannot blog about the projects I worked on for the last three weeks! Why? Real Santa doesn't give and tell...at least not in advance.

And so I suffered in silence with so many lovely items in front of me. And I so wanted to share it with you.

And finally today I snapped. Here is a sneak peak into two beautiful projects. You cannot see the entire item but at least you can enjoy the lovely crisp blues. I am also particularly proud of the texture of both items. The yarn feels soft under your fingers, but the way it is knotted provides for a very interesting, 3D effect.

Working on the projects, I have also discovered an interesting thing about my creativity. Namely, I am much more inspired and work faster when the item, I am making, is for a person I know. Not only my creative juices flow in abundance but I am also more motivated to work. Very rewarding.

Maybe this is the trick for the future. Always work with a person in mind.

Thursday, 10 September 2009

Crochet Gloves in Organic Green

So here, I haven't been all that lazy after all. I started the gloves back in London and crocheted them all the way through Europe. I guess, this is the most international project I have worked on so far.

I love the slender look the gloves give my hand. They, well actually so far only one of them, is 20cm long and reaches up to mid of my lower arm. They are made with my favorite organic cotton, so soft and smooth in touch. Still, loving them as much as I do, I have to figure out glove measurements so I can post them online and share them with you! Otherwise they will only fit me. Anyone has any ideas?

And below is a bonus photo of The Glove attacking Local Tiger during her afternoon nap.


Tuesday, 14 July 2009

Organic scarf

Thanks to the John Lewis sale I was able to buy a lot of beautiful naturally dyed organic cotton. My idea was to crochet a large shawl for which I had already found a pattern. But after reading Yoola's article and doing a quick analyzes of my shop I decided to produce several organic summer scarves - thanks to the sale I can sell them really cheap.


The pattern I used for the first two of the scarves is lacy but it also has regularly placed bobbles which gives it tick texture. I tested the prototype scarf on my trip to Belgium and the result is very good. The color fits summer outfits very well and the scarf can be worn loosely to act as an accessory or can be closely wrapped around the neck to protect you from cold summer evenings.

I will post the scarf on etsy very soon.